These are the steps to take for quickly creating a bare-bones Laravel app using a MacOS environment and the newly released Laravel Herd. For this example, the name of the app is “my-new-app”. You can call it whatever you want.
I’ve written these steps out for myself as I find the current Laravel documentation a bit overwhelming with the amount of options. Hopefully you’ll find them useful.
Prerequisites
These are the apps I’m running to set up Laravel. You don’t need these specific apps, but they make the workflow much easier.
- DBngin: Runs MySQL
- Laravel Herd: Runs PHP and Laravel dependencies
- Sequel Ace: Provides MySQL database management
- Visual Studio Code: Code editor
Install Laravel
To install a new Laravel app,
- Open Terminal.
- Enter
cd Herdto go to your Herd directory. If you install the new app here, Laravel Herd will automatically recognize it. - Enter
laravel new my-new-appto install the app.- Select No starter kit.
- Select Pest for testing framework.
- Select yes for initializing a Git repo.
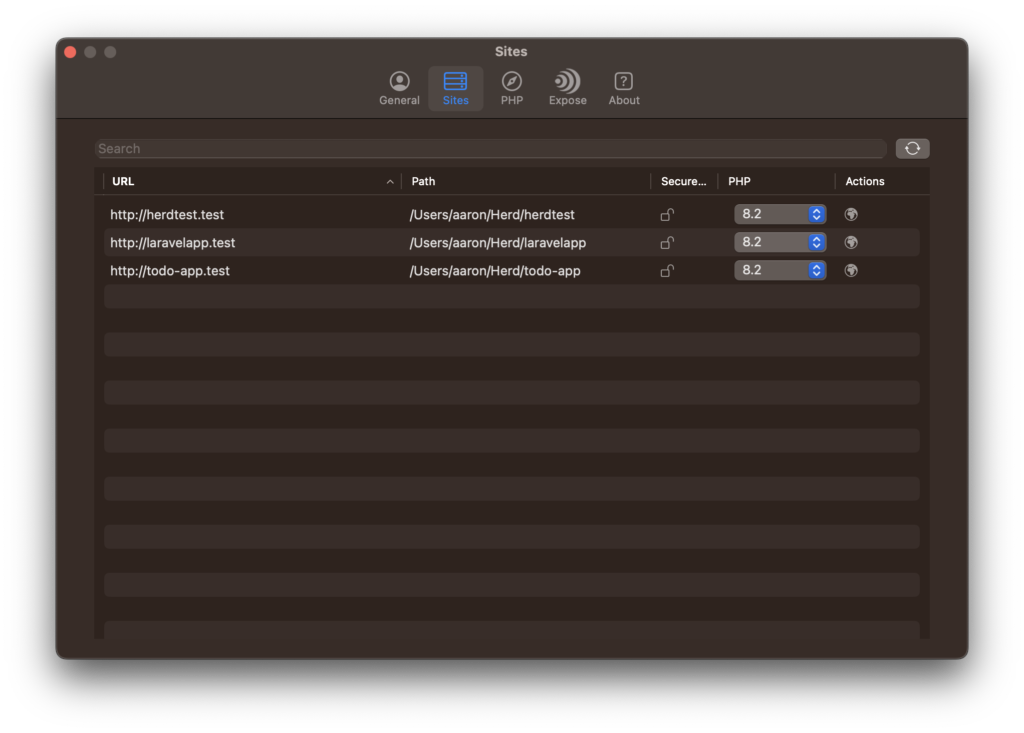
Using Laravel Herd
To confirm your app is installed,
- Open Herd.
- Select Sites and look for a URL like my-new-app.test. Click refresh if you had Herd open before you installed the app.
- Select the globe icon in the Actions column to open the app in a browser window.
After we have the new Laravel app installed, we need to set up the database for it to connect to.
Setup Database
- Open Terminal.
- Enter
cd Herd/my-new-appto navigate to the new app folder. - Enter
code .to launch Visual Studio Code in that folder. The first time you open this folder in VS Code, it will ask you if trust the authors of this folder. - Open the .env file to confirm the name of the database Laravel is looking to connect to. For “my-new-app” the database name should be “my_new_app” (note the conversion of dashes to underscores).
- Open DBngin and start the MySQL service.
- Open Sequel Ace and connect to the default connection which should have the same settings as your newly installed Laravel app .env file:
- Host: 127.0.0.1
- Username: root
- Password: (none)
- Port: 3306
- Using Sequel Ace, select Add Database and enter the same database name as set in your Laravel app’s .env file. Leave the database encoding and collation at their defaults.
- Once the database is created, go back to your Terminal, which should still be in Herd/my-new-app and enter
php artisan migrateto populate the database. - After running the migration, you should see several tables in Sequel Ace after refreshing. If you run into an error as this point, confirm that MySQL is running and that your new database name matches the name in your .env file.
Install packages
Laravel uses several NPM packages that need to be installed after creating the project.
To install your NPM packages,
- Open Visual Studio Code and select Terminal > New Terminal. This will open a terminal within Visual Studio Code instead of using the stand-alone Terminal app that comes with MacOS.
- Enter
npm install. - After the packages are installed, test out the dev and build NPM Scripts that were configured when you created the new Laravel app. They should run without issues.
After all these steps, you should have a bare-bones Laravel app ready for development.